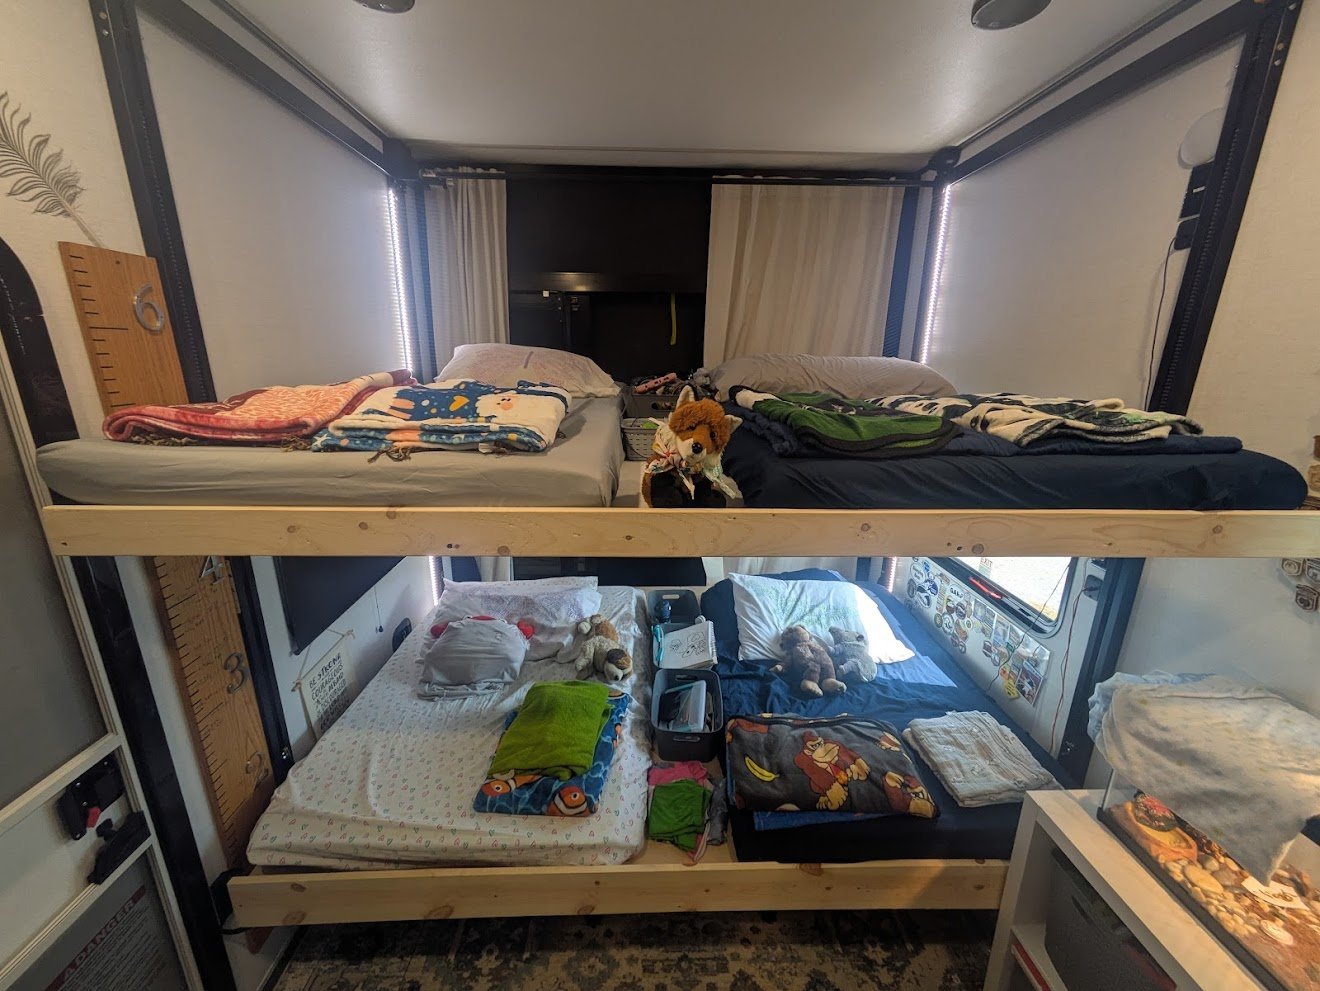
We have four kids and we wanted the garage to be their room. Simple enough goal - but the Happijac system our RV came with wasn't set up for it. The bottom portion was a pair of couches that were uncomfortable to sleep on, and the top was a frame built for a single queen mattress. That works for two kids at most, and even then not well.
So we rebuilt it. The lower bunk is a new platform we built from scratch to replace the couches entirely. The upper bunk frame was actually built well by Happijac - we just extended it from 60 inches to 75 inches so it could fit two twin mattresses front to back instead of one queen.
This post covers both builds - the lower bunk platform and the upper bunk extension - including the exact cut list we used, the hardware that holds it together, and what we'd do the same (and differently) if we built them again.
- Bunk Size (Lower)
- 90in wide x 70in long
- Bunk Size (Upper)
- 90in wide x 75in long (original 60in Happijac frame + 15in extension)
- Cost
- Under $200 in materials for both builds. We also used tools we already had or borrowed from friends.
- Original System
- Happijac Bunk System
- Build Time
- 1-2 days total


Why We Rebuilt It
The Happijac lift mechanism is great - it raises and lowers reliably and the hardware is solid. But the sleeping surfaces it came with weren't working for a family of six living full time on the road. The couches on the bottom were uncomfortable as beds, and one queen mattress up top doesn't sleep four kids.
We wanted the garage to function as a real bedroom. That meant a proper lower bunk platform to replace the couches, and a wider upper frame that could actually fit two kids side by side. Construction lumber from Home Depot, a few boxes of screws, a tube of construction adhesive, and four sheets of plywood. That's it.
The Design
The lower bunk is built entirely from scratch - a complete 2x2 frame with five internal cross slats, center blocks along the middle line for added rigidity, and diagonal corner braces at all four corners, sheathed in plywood on the top and bottom once the frame is built. Three additional 2x2s are then fastened to the outside bottom running perpendicular to the internal slats for added rigidity, plus two fold-down Happijac couch supports in the middle that were already part of the original couch installation. A 1x4 face board along the front edge finishes the look.
The upper bunk we didn't tear out - the original Happijac frame was well built and the side brackets were solid. We just extended it 15 inches to bring it from 60 to 75 inches so two twin mattresses could fit front to back. The extension is sheathed in plywood on the top and bottom using scrap from the lower bunk cuts - zero extra sheets needed. A 1x3 face board cleans up the front edge and 1x2 rails keep the mattresses from shifting while we drive.
The key with both builds was keeping them rigid without adding unnecessary weight. An RV bunk that flexes when a kid rolls over in the middle of the night gets old fast.
Plywood
We used RevolutionPly 5mm Poplar Plywood (4 ft x 8 ft sheets) from Lowe's - or something similar. It's lightweight, sands well, and holds a finish. We bought 4 sheets total and cut them with minimal waste:
- Sheet 1 - lower bunk top surface, piece 1: trimmed to 48in x 90in
- Sheet 2 - lower bunk top surface, piece 2: cut to 22in x 90in / scrap (26in x 90in) cut down to 15in x 90in for upper bunk extension top surface
- Sheet 3 - lower bunk bottom surface, piece 1: trimmed to 48in x 90in
- Sheet 4 - lower bunk bottom surface, piece 2: cut to 22in x 90in / scrap (26in x 90in) cut down to 15in x 90in for upper bunk extension bottom surface
The lower bunk top and bottom surfaces are each pieced from two cuts (48in + 22in = 70in). The upper bunk extension top and bottom surfaces come entirely from the leftover scrap. Four sheets, nothing wasted.
Supply List (Lower Bunk)
All 2x2s were purchased as 2x2x8 boards (96in each) and cut down to size. Each 96in board only yields one 87in piece with 9 inches left over - not enough to reuse. Same with the 70in pieces - one per board. Plan for that before you head to the store.
- 2x2x8 boards - buy 13 boards to yield:
- 5 pieces @ 87in (cross slats)
- 2 pieces @ 70in (side rails)
- 3 pieces @ 70in (under-bunk supports)
- center blocks and corner braces cut from scrap
- 1x4 @ 90in - 1 piece (front face board)
- 5mm plywood 4x8 sheets - 2 sheets (top and bottom surfaces, each pieced from two cuts)
- Construction adhesive - 1+ tubes
- 3in wood screws - 1 box
- 4.5in wood screws - 1 box

Cut List (Lower Bunk)
| Component | Lumber | Qty | Cut Length | Notes |
|---|---|---|---|---|
| Cross Slats | 2x2 | 5 | 87in | 1 cut per 2x2x8 board - need 5 boards |
| Side Rails | 2x2 | 2 | 70in | 1 cut per 2x2x8 board - need 2 boards |
| Under-Bunk Supports | 2x2 | 3 | 70in | Fastened to outside bottom of plywood sandwich, running front to back perpendicular to internal slats |
| Center Blocks | 2x2 | several | cut to fit | Short scrap pieces screwed to each slat along the center line - slightly offset to allow easy screwing |
| Corner Braces | 2x2 | 4 | cut to fit | Diagonal braces at each corner - cut from scrap |
| Top Surface - piece 1 | 5mm plywood | 1 | 48in x 90in | Trimmed from full sheet width |
| Top Surface - piece 2 | 5mm plywood | 1 | 22in x 90in | Cut from second sheet - save 26x90 scrap |
| Bottom Surface - piece 1 | 5mm plywood | 1 | 48in x 90in | Trimmed from full sheet width |
| Bottom Surface - piece 2 | 5mm plywood | 1 | 22in x 90in | Cut from fourth sheet - save 26x90 scrap |
| Front Face Board | 1x4 | 1 | 90in | Cleans up the visible front edge |
Note on stability: We reused the two fold-down Happijac couch supports that were originally part of the couch installation. These sit in the middle of the lower bunk and support the platform when it's down. If your Happijac setup still has those supports, don't remove them - they're doing real work.

Supply List (Upper Bunk)
The original Happijac frame (60in x 90in) was solid - we only needed to extend it 15 inches. The extension is sheathed top and bottom using scrap from the lower bunk plywood cuts, so no additional sheets are needed. The original Happijac side brackets supported everything without any additional mounting hardware.
- 2x2x8 boards - buy 3 boards to yield:
- 2 pieces @ 90in (long rails)
- 7 pieces @ 12in (all fit from one board)
- 1x3 @ 75in - 1 piece (front face board)
- 1x2 @ 75in - 2 pieces (mattress rails)
- 5mm plywood - use scrap 26in x 90in pieces from lower bunk cuts, trimmed to 15in x 90in (top and bottom of extension)

Cut List (Upper Bunk)
| Component | Lumber | Qty | Cut Length | Notes |
|---|---|---|---|---|
| Long Rails | 2x2 | 2 | 90in | 1 cut per 2x2x8 board - need 2 boards |
| Cross Supports | 2x2 | 7 | 12in | 8 fit on one board - need 1 board |
| Extension Top Surface | 5mm plywood | 1 | 15in x 90in | Cut from scrap of sheet 2 |
| Extension Bottom Surface | 5mm plywood | 1 | 15in x 90in | Cut from scrap of sheet 4 |
| Front Face Board | 1x3 | 1 | 75in | Cleans up the visible front edge |
| Mattress Rails | 1x2 | 2 | 75in | Keep mattresses from sliding while traveling |
Note on mounting: We didn't need additional brackets for the top bunk - the original Happijac side brackets supported the frame well once we extended it. Don't over-engineer it. If your Happijac hardware is solid, trust it.

Total 2x2x8 Board Count
| Build | Boards |
|---|---|
| Lower bunk (slats, rails, under-bunk supports, scrap for blocks and braces) | 10 |
| Upper bunk extension (rails and cross supports) | 3 |
| Grand total | 13 |
Total Plywood Sheet Count
| Sheet | Use | Cut | Scrap |
|---|---|---|---|
| 1 | Lower bunk top surface - piece 1 | 48in x 90in | none |
| 2 | Lower bunk top surface - piece 2 | 22in x 90in | 26x90 - cut to 15x90 for upper bunk extension top |
| 3 | Lower bunk bottom surface - piece 1 | 48in x 90in | none |
| 4 | Lower bunk bottom surface - piece 2 | 22in x 90in | 26x90 - cut to 15x90 for upper bunk extension bottom |
How We Built It
We assembled both frames outside the RV first - that's the only way to do it with any amount of working room. Both builds are essentially the same concept: a 2x2 outer rectangle with 2x2 cross supports spaced evenly inside, screwed together with 3in wood screws and locked in with construction adhesive at the joints.
Lower bunk: Build the complete frame first - the outer 2x2 rectangle with all five 87in cross slats spaced evenly inside, everything screwed together and locked in with construction adhesive. Use scrap pieces to add short center blocks along the center line between each slat - offset them slightly from each other so you can get a screw in easily. Add diagonal corner braces at all four corners from scrap as well. Once the frame is fully built, fasten the plywood skins to both faces - bottom first, then top - piecing the two cuts (48x90 and 22x90) together on each face. Finally, fasten the three 70in support pieces to the outside bottom of the plywood, running front to back perpendicular to the internal slats. The 1x4 face board fastens along the front visible edge to finish things off. The two Happijac couch supports in the middle do the rest of the stability work when the bunk is down.
Upper bunk: We started from the existing Happijac frame and extended it 15 inches using 2x2 rails and cross supports. The scrap plywood from the lower bunk cuts sheathes the top and bottom of the extension. The 1x3 face board runs the full 75in length to clean up the front edge. The 1x2 rails keep the mattresses from shifting while we're rolling down the road.
Both builds are pretty forgiving. Measure twice, cut once, and get everything square before you lock it in with adhesive.

Cost, Timeline, and Expectations
We were well under $200 for both builds combined, and the whole thing took about a day and a half - with plenty of kid helpers along the way.
This is construction lumber in a moving vehicle. It will flex slightly. That's expected and fine. What you're building is a functional, safe sleeping surface that travels - not a showpiece. The 2x2 slat system on the lower bunk gives just enough flex to be comfortable while staying solid enough to not feel like a trampoline.
After miles and miles of road, both bunks have held up exactly the way we hoped.


Final Thoughts
If you have a Happijac system and you're trying to figure out what to actually put on it, this build is a solid starting point. It's not complicated, it's not expensive, and it works.
And if you're into the whole RV life / roadschooling thing, come hang out with us - we're @milemarkersandmemories on Instagram and we document the whole journey.